2
Start Event Viewer by clicking on the "Start" button and choosing "Control Panel" from the menu. When "Control Panel" starts, make sure you're using the classic view. If you're not, double-click on "Switch to Classic View" in the left-hand pane.3
Double-click the "Administrative Tools" applet, then choose "Event Viewer." Look through the tabs and search for an event with a time stamp matching the time of your last computer freeze or crash. Note the name of the application that caused the crash. You may need to reinstall this problematic program.4
Close Event Viewer and start Task Manager by right-clicking on an empty area of the taskbar and choosing "Task Manager" from the menu. Click the "Applications" tab and note any programs with a status of "Not Responding." Then click the "Processes" tab and click on the "CPU" heading to sort the processes by how many system resources they are consuming. Look at the process that is using the most system resources. For instance, if Excel is using 100% of CPU time it is probably not running correctly and will need to be reinstalled.5
Click on the "Start" button and choose "Control Panel" from the menu. Double-click the "Add/Remove Programs" applet and locate the program that is causing the bottleneck. Click on the "Change" button if one is available and choose "Repair" to repair the program. If no "Change" button is visible, the program does not have a repair function--you will need to click the "Delete" button, remove the program and reinstall it.
To enhance the perfomance of your system;
3
Run the software. The software should prompt you to scan your computer. If the benchmarking software doesn't prompt you, run the software manually.4
Read the results. You should see information about things such as your processor speed, RAM usage, memory taken and hard disk capacity E.T.CAn example of software you could use is;


CONTD:
ü CMOS /BIOS SET-UP: I checked the CMOS Set up to make sure the appropriate drive is set as the bootable device (the hard drive). I also made sure that the Time and Date are set correctly and I also made sure that the power supply is circulated. So the next time I turned on my computer all of this features were functioning properly. To view the CMOS set-up, it depends on the type of system you are using; in some computers you are asked to press F8 or DEL.

ü POST (Power-on-self-test): I Performing the power on self test made me know if all my device drivers and other peripherals like the keyboard and mouse were functioning properly. The POST also helps to know which device is set as the master and which is set as the slave. When the POST loads it also shows what type of micro-processor, memory (whether 32-bit or 64-bit). It basically shows the type of configuration you have made, if the configurations are wrong it tells you so you can amend it immediately.
ü INITIATION OF REGISTERS AND POWER MANAGEMENT: To do this I loaded the CMOS Set-up and initiated the power management set up and the Frequency/ voltage control.  telling you to press any key to check your file system.
ü DISPLAY SYSTEM SETTINGS: I made sure the display settings is set to its appropriate resolution and colour
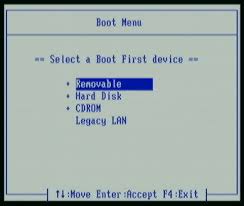
ü DETERMINING BOOTABLE DEVICE: I determined the bootable device by loading the boot menu and I selected the hard drive as my first bootable device. This configuration was determined to be correct by the POST.

ü INITIATE BOOTSTRAP SEQUENCE: A boot sequence is the set of operations the computer performs when it is switched on which load an operating system.
This is an example of my computer going through boot sequence.

No comments:
Post a Comment