In order to design and install a stand-alone system to meet specified user
needs you will need to develop the following skills and techniques:
- installing a stand-alone PC
- installing operating system software
- installing application software
- configuring hardware and software
- preparing and implementing test procedures
Application Software
You must be able to select appropriate types of application software and choose between different packages. In order to do so, you will need to know about, and have had hands-on experience of, as wide a range of software as possible, including:
- word processing software
- spreadsheet software
- database software
- website software
- artwork and imaging software
- presentation software
- specialist software, such as:
- accounts applications
- logistics planning applications
- computer-aided design applications
- digital video editing
- music composition and editing
- project management applications
Operating System Software
You must know about operating system software and be able to assess
features, including:
- ability to customise
- support for connectivity of portable media
- security, stability and reliability
- ease of management
- associated utilities
- cost and support for the user
You will need to learn how to select the most appropriate operating
system for the systems you are designing. It is not necessary at this stage to learn about networks, but you do need to understand the difference between single user and multi-user operating systems.
System Hardware
Before you can design a hardware specification for a system, you need a good understanding of ICT components and their purpose, including:
- motherboards (Pentium II mobo pic)
- processors
- heat-sinks
- fans
- multimedia devices, such as graphics cards, sound cards, TV cards
- network interface cards
- hard disks (1GB Then & Now)
- optical drives
- other storage media
- main memory
- input and output devices
- ports
system Installation
You will learn about the procedures involved in system installation and the need to work in a safe, controlled environment.
You will gain practical experience of installation by setting up a stand-alone computer system. You will learn how to connect at set up equipment such as:
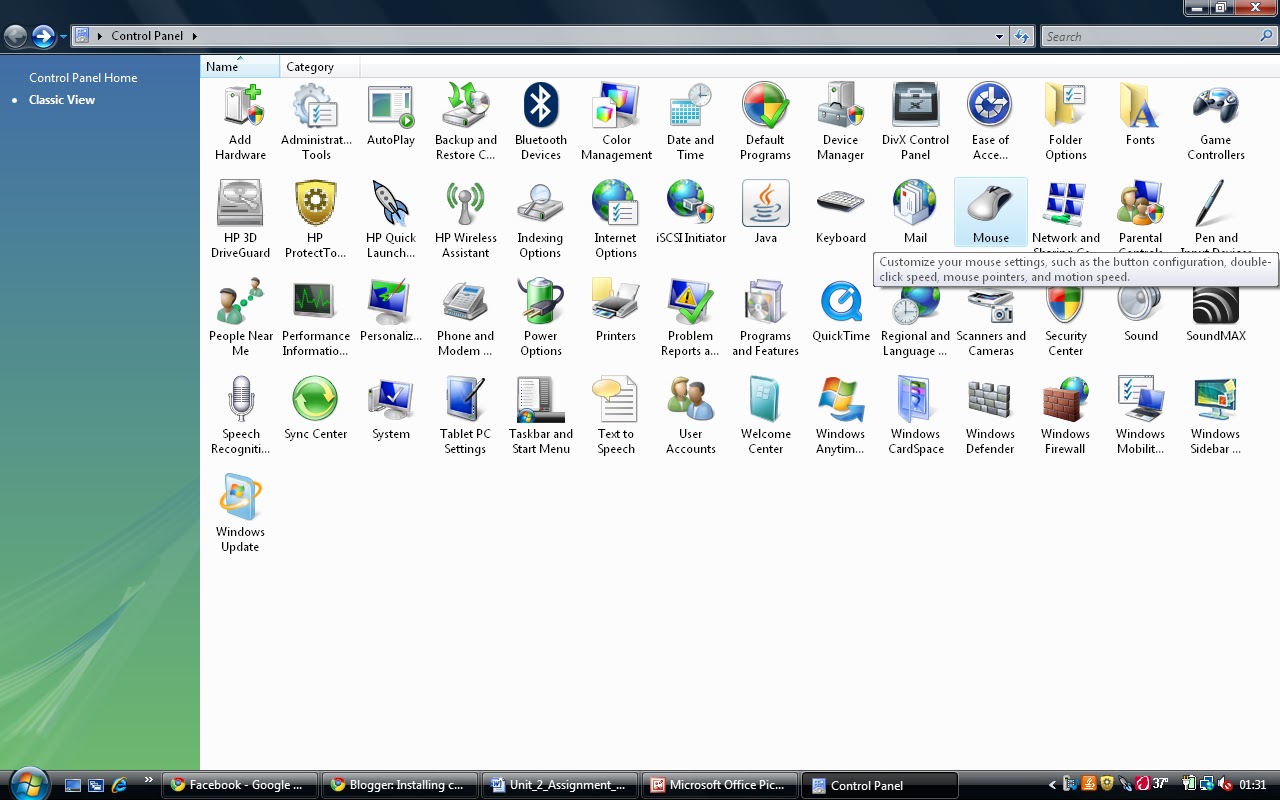
- Monitor: Your monitor should be operated in subdued light; strong direct light should not reach the screen, your display adaptor software should be set to 24 or 32 bit color (True Color). To see the setting, right-click on the Windows wallpaper (the background outside any open windows), then click on Properties, Settings. Set the 'contrast', which is also called 'picture' on some monitors to its midpoint. You need to select the type of monitor you want to use.

Printer:
Setting Up a Network Printer 1. Click on the Start button, then click Control Panel, then click Printers and Faxes, then click Add Printer. |
|
| |
|
| |
2. A new Add Printer Wizard window opens. Click Next to start. |  |
|
| |
3. Select Local printer attached to this computer. Make sure Automatically detect and install my Plug and Play printer is NOT checked.
4. Then click Next to continue. |  |
|
| |
5. We will create a new port for your network printer.Select Create a new port.
6. Beside Type of Port, click on the down arrow, then click on Standard TCP/IP Port.
7. Click Next to continue. |  |
|
| |
8. A new Add Printer Port Wizard will open. Click Next to continue. |  |
|
| |
9. You must now type your printer's IP Address in the Printer Name or IP Address field.
10. The Port Name will automatically be filled when you enter the IP Address. Do not change the Port Name.
11. Click Next to continue.
|  |
|
| |
12. IF YOU HAVE PROBLEMS, then you will see the screen on the right.This means that the IP Address for the printer is NOT available on the network. Select the Back button and make sure you entered the correct IP Address. Check to see that your network printer is powered on and displays a 'ready' status. |  |
|
| |
13. IF YOU DID NOT HAVE PROBLEMS, Windows XP will scan the network to find your printer's IP Address. This may take a few seconds. Select Finish to continue. |  |
|
| |
14. You must now select the printer's manufacturer and model.Windows XP will automatically select the detected manufacturer and printer driver. Normally, you will not have to change this selection. 15. OPTIONAL: If your printer is listed but you have more than one printer model to choose from, please select the model with PS, if available. 16. IF your network printer is NOT automatically detected, select the Windows Update button to find the proper software drivers. |  |
|
| |
Note: If your printer is not automatically recognized using Windows Update, please call your Help Desk.
|
| |
17. You will be prompted to confirm the selected printer driver. Make sure Keep existing driver is selected, then click Next to continue. |  |
|
| |
18. You will be prompted to assign the printer a Name. You can use the default name, or add more info to indicate the printer location, such as My Office, Hallway, Foyer, Room 222, etc. 19. Select Yes if you want to use the printer as the default printer. Click Next to continue. |  |
|
| |
20. You will be prompted to share the network printer. Do NOT share the network printer. 21. Click Next to continue. |  |
|
| |
22. You will be prompted to print a test page. Select Yes, then click Next. 23. Check your network printer to make sure your page printed.Select Yes when prompted to confirm a successful test page. 24. Click on the Finish button to complete the Add Printer Wizard. |  |
|
| |
Congratulations! If your test page printed, you have successfully installed the network printer. |
- modem/router:
- keyboard/mouse
- speakers
- microphone
install components, such as:
install and configure software, including:
- operating system software: Installing windows such as windows XP
1. if you're planning on installing Windows XP on a new, empty hard drive, The most important before setting up Windows XP is to check the minimum system requirements for installation.
2. Boot From the Windows XP CD; To begin the Windows XP installation process, you will need to boot from the Windows XP CD. Watch for a Press any key to boot from CD... message similar to the one shown in the screen shot above. Press a key to force the computer to boot from the Windows CD. If you do not press a key, your PC will attempt to boot to the next device in the boot order, which is probably your hard drive. Since your hard drive has no operating system on it, the boot process will fail.
3. Press F6 to Install a Third Party Driver
Install Windows XP - Step 3 of 30
The Windows Setup screen will appear and a number of files and drivers necessary for the setup process will load.
4. Press ENTER to Set Up Windows XP
Install Windows XP - Step 4 of 3
After the necessary files and drivers are loaded, the Windows XP Professional Setup screen will appear.
5. Read and Accept the Windows XP Licensing Agreement
6. Create a partition
Since your hard drive is probably new or has never been used, all of the space on it is unpartitioned. In this step, you will create a new partition for Windows XP to use.
7. Choose a partition
Here you need to choose a size for the new partition. This will become the size of the C drive, the main drive on your PC that Windows XP will installl to.
8. Choose a partition to install windows xp on
Highlight the line with the newly created partition and press Enter to set up Windows XP on the selected partition.
9. Choose a file system to format the partition
For Windows XP to install on a partition on a hard drive, it has to be formatted to use a particular file system - either the FAT file system format or the NTFS file system format. NTFS is more stable and secure than FAT and is always the recommended choice for a new Windows XP installation.
10. Wait for the new partition to format
Depending on the size of the partition that you are formatting and the speed of your computer, formatting the partition could take anywhere from a few minutes to several minutes or hours.
11. Wait for the Windows XP Installation Files to Copy
12. Windows xp installation begins
Windows XP will now begin installing. No user intervention is necessary.
13. Choose regional and language option
During installation, the Regional and Language Options window will appear.
14. Enter your name and organization
In the Name: text box, enter your full name. In the Organization text box, enter your organization or business name. Click Next > when complete
15. Enter a computer name and administrator password
16. Set the date and time
In the Date and Time Settings window, set the correct date, time and time zone settings.
Click Next > when complete.
17. Choose the networking settings
The Networking Settings window will appear next with two options for you to choose from -Typical settings or Custom settings.
18. Enter a work group or domain name
19. Wait for windows XP installation to finalise
The Windows XP installation will now finalize. No user intervention is necessary.
20. Wait for restart and first windows XP boot
Your PC will automatically restart and proceed to load Windows XP for the first time.
21. Accept automatic display adjustment
22. Confirm automatic display adjustment
23. Begin final set up of windows XP
The Welcome to Microsoft Windows screen appears next, informing you that the next few minutes will be spent setting up your computer.
24. Wait for Internet connectivity setting
The Checking your Internet connectivity screen appears next, informing you that Windows is checking to see if your computer is connected to the Internet.
25. Choose an Internet connection method
In this step, Windows XP wants to know whether your computer connects to the Internet through a network or if it connects to the Internet directly.
26. Optionally register windows xp with Microsoft
Registration with Microsoft is optional, but if you'd like to do that now, choose Yes, I'd like to register with Microsoft now, click Next -> and follow the instructions to register.
Otherwise, choose No, not at this time and click Next ->.
27. Create initial user account
In this step, setup wants to know the names of the users who will use Windows XP so it can setup individual accounts for each user. You must enter at least one name but can enter up to 5 here. More users can be entered from within Windows XP after installation is complete.
28. Finish final set up of windows xp
All of the necessary files are installed and all of the necessary settings are configured.
Click Finish -> to proceed to Windows XP.
29. Wait for windows XP to start
Windows XP is now loading for the first time. This may take a minute or two depending on your computer's speed.
30. Windows xp installation is complete
This completes the final step of installing Windows XP! Congratulations! If you're new to Windows XP, click on the balloon (shown above) to take a tour.
- applications software
- create appropriate directory/folder structures
System Configuration
You will learn how to customise the system by altering the configuration of
both system and application software to suit a client’s needs, including:
- accessing the BIOS and making suitable and safe changes, such as setting a BIOS password to prevent unauthorised access, editing power management options etc.
- editing anti-virus configurations
- editing the desktop — icon size, font size, colour, background, icon choice
- creating start-up options
- setting file sharing/permissions
- creating and reconfiguring application toolbars
Health and safety:
- ensuring that hardware, cables, seating etc are positioned correctly
- ensuring that lighting is appropriate
- taking regular breaks
- handling and storing media correctly